
Here are top tips for photographing jewellery at home using your smartphone or tablet. Perfect for when you want to showcase your handmade jewellery pieces.
When you maximise the professional look of your photographs uploading them to your Instagram, Facebook page or online shop like Etsy, Shopify or your own website, just adds more to your marketing and sales.
Starting out it can be easier to just take the photo and upload it without styling, lighting or editing. However when you are serious about selling your handmade jewellery these tips will help you build up a library of quality photos you won’t need to update in the future.
We have been making and selling our jewellery making supplies and kits for nearly 20 years. Of the last 10 years photography and online photography has become much more important. We did our research and looked at what the big retailers were doing to style their shots like Argos to Tiffany’s.
Now these major brands and retailers use leading professional photographers, styling studios and style briefs to create the look and experience in every image.
We took our research to the next level and watched what independent retailers on Ebay and Etsy were doing. Combining the research and downloading styles we liked we were able to begin taking our in-house jewellery photography to a much more professional level.
Top Tips
Follow these top tips created by Donna McKean Smith to take photographing your jewellery to a more professional level.
1) Styling Research
Get searching on the platforms like Pinterest, Instagram, Facebook, Etsy, Ebay and look at what other brands and independent craft and jewellery makers are doing. Remember photography tends to have a trend and fashion style. Be inspired by it, and also create your own unique style to personalise your images to you.
2) Backdrops
Plain backdrops are more effective because they don’t detract from the jewellery. For a different feel it is nice to use something textured, like a wallpaper or tile panel. Places like B&Q and Amazon sell different types of panels from fretwork to faux white brick. These can be really interesting without detracting from your jewels. However if you want to ‘cut out’ your jewellery and remove the background when editing it’s better to use a plain backdrop.
3) Styling and Props
If you’re not cutting your pieces out then you might wish to use some props within your designs. Props can enhance a style and elevate its value or establish a particular look and feel. For example using a velvet pad or a piece of swathed velvet can really add a luxury feel. Similarly if your jewellery is more ethnic then you might consider using a piece of driftwood or hessian.
Just remember your goal is to heighten the pieces visually and not detract from them. It’s best to avoid anything too busy or similar in colour. The key is to ensure the focus (literally) is on your designs.
4) Lighting
Lighting is the key with any photos and it’s essential you have as much natural and or enhanced lighting as possible. No point trying to take photos in the dark with a flash, it just doesn’t work. The flash whites out important facets of your jewellery, especially with anything crystal based. It can also highlight even the tiniest piece of dust.
Also taking photos next to a sunny window, for example, causes real issues with shadows. The solution is to set up a table further back in a brightly lit room, either with natural or good artificial lighting. If the light is coming in from the side then ideally set up another light on the opposite side. This will counter act any shadows.
Very popular now are light rings on tripods which are great to use when you are talking to the camera. However they also act as a great extra backlight when you are setting up.
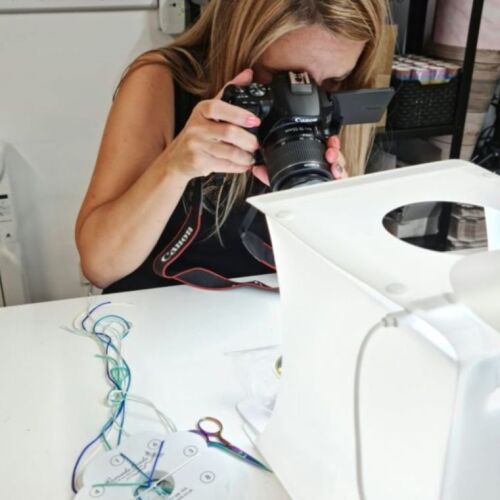
From your research you might notice many products are photographed on a white background and this is usually done using a light box. You can buy a light box for reasonably low cost or make your own. A light box isn’t essential but it does ensure a contained and consistent light, and reduced shadow issues. If you’re planning on selling professionally it is recommend to work with a light box to get the consistency and brightness to your images.
5) Taking the Photographs
A tripod is also useful if you find you have an unsteady hand. While many of the smartphones have a feature to counteract natural shakes, the tripod will give you assurance as you have set up your shot.
Once the styling, lighting and tripod is set up, it’s advised to take several shots. This will give you 3-6 different images to choose from. You might also decide to take different angles of the same product styling to give a variation or slideshow when you showcase your products.
6) Image Format and Editing
Now you’ve got your shots you need to review and edit them. However careful you were with your framing you can always make them better with editing. You may be able to edit on the phone or tablet itself using either the built in edit functions or an app like Photoshop. Alternatively you can upload your photos onto a desktop computer and use the installed photo editor.
The main things to consider are framing and brightness. If the platform you are selling on requires only square images (thumbnails) then use the crop tool.
Use the brightening tool to lift your image even more, however be careful not to overexpose or saturate your colours.
If you’re selling steam punk jewellery then consider using an antique filter on your cover shot to entice the customer to click your listing. Just make sure you have some ‘real life’ versions included as well.
If you’re after that plain, ‘cut out’ look mentioned earlier, there is a free website called Remove Image Background which removes backgrounds for you without much fuss.
Getting It Right
Remember it takes practice when you are working towards a photographic style and finish for your jewellery pieces. Test different lighting, backdrops and editing features. Most importantly, get your images out there. As soon as people can see what you are making the sooner you sell, and then you can enjoy making and designing more.
Donna McKean Smith is the owner of Riverside Beads, Author, TV presenter and Workshop Tutor. You can find tutorials on our Inspiration page, join our Wednesday Live FB Tutorials and subscribe to our Youtube Channel. Come and join us in our Facebook Beading and Jewellery Making Community when you subscribe to our newsletter.
Great tips, thanks Donna.